
Appendix 6a: Checkmates
How do you win a game of chess? One way is to checkmate your opponent, and if you want to play chess well you'll need to know the basic checkmate positions. These are the building blocks for the more complicated attacks against the king that you'll use in your own games, and once you learn them they will serve you well. You can't force checkmate in the opening, although you might catch your opponent in a trap now and then, and in the endgame he tends to resign before he gets mated. That leaves the middlegame.
Let's start with the easiest, king and queen against king, and then we'll move up a step with rook and king against king. Diagram 1 shows four separate and independent positions.
Diagram 1 (a, b, c, d)

Diagram 1a shows K and Q vs. K
K on c6, Q on a7, k on c8
1a Qa8 mate or 1a Qc7 mate
Diagram 1b shows K and Q vs. K and B
K on g6, Q on h6, k on g8, b on h8
1b Qh7+ Kf8 and then Qf7 mate
Diagram 1c shows K and R vs. K
K on f3, R on h3, and k on f1
1c Rh1 mate
Diagram 1d shows K and R vs. K
K on b3, R on d3, and k on c1
1d Rd4 Kb1 and then Rd1 mate
All four positions - White to move and force checkmate in one move (1a, 1c) or two moves (1b, 1d)
The setups in 1a through 1d are basic positions. They are important. In each case White's king stands exactly opposite Black's king, there is one empty rank between the kings, White is on the move, and White can force checkmate - Black can't do anything about it. Let's look at them one at a time.
Diagram 1a is the classic checkmate position. White has a queen, and so has two options. White can check on the back rank with Qa8+ and the Black king can't get off the rank because the White king blocks him. Note that a rook check on a8 would work just as well. The queen can also deliver mate with Qc7+ which the rook can't.
Diagram 1b looks like 1a but includes a bishop on h8 to prevent the queen from giving mate on g7. White still forces mate but it takes an extra move. Qh7+ forces the king to f8 where he is mated by Qf7+. This is a common maneuver. From his position on g6, White's king can protect the queen on three squares in front of the black king, f7, g7, and h7. By checking on h7, the queen gets on the rank with tempo (it's not mate, but after Black's next move it will be and the queen hasn't lost any time in the process), and forces Black's king to slide over one square to a new home away from the bishop, where he is promptly mated.
Diagram 1c is the same setup as Diagram 1a, except for the Rook instead of the Queen. The rook only has one way to mate, along the rank, but that's all it takes. 1c Rh1+ mate.
Diagram 1d is very important. It shows you how to force your opponent's king to move over one square so you can checkmate him. In the diagram, blacks king needs to be forced to move from c1 to b1 so the rook can come down to d1 and deliver mate without getting itself captured. Here's the key. The rook stays on the d file and prevents Black's king from making a run for it with Kd1. The rook does not move off the d file, but simply backs up a square or two, say to d4, and now it's Black's turn to move. Black would like to stay where he is on c1 to stop the rook from coming down to d1, but he can't. He has to move and the only square available to him is b1. That opens up the d1 square, and Rd1+ is mate. The chess term for this predicament is zugzwang. You are fine as long as things don't change, but you have to move, which changes them, and then you're done for. If you want to sound like a chess player, you should practice saying it in front of a mirror and then play over Saemisch vs Nimzovich (another important chess term), Copenhagen 1923, preferably out of My System, and enjoy the full flavor of Nimzovich's annotations.
As a reminder, Diagram 4 in the main section of How to Play Chess Well shows four basic checkmates using various pieces. Diagram 9 in the Chess Notation appendix shows the original smothered mate, as described by Lucena.
Here are a few more basic mates.
Diagram 2 is in four stages, a, b, c, and d.
Diagram 2

This is called Lolli's Mate. The starting pattern is shown in Diagram 2a. White pushes the f pawn to f6 threatening mate with the queen on g7. Black's only move is to push up his g pawn one square (Diagram 2b). This leaves the square h6 unguarded, and into the hole goes White's queen (Diagram 2c) with mate on g7 coming up (Diagram 2d). This happens often and is a good example of how pawn moves in front of the king can weaken the squares around the king. We'll see more of this below.
Diagrams 3a and 3b show typical knight and bishop mates.

In Diagram 3a the knight mates with Ne7+ because the bishop prevents the king's escape to g7 or h8.
In Diagram 3b the bishop moves to the hole on f6 and checks, forcing the king to move to g8, which leads to the position in Diagram 3a, and the knight mates with Ne7+.

In Diagram 4a the black bishop on g7 greatly strengthens Black's position and the mating threats age gone. Never let your opponent bring more pieces to the attack than you can bring to the defense. The bishop on g7 gives sturdy defense to the king. See the fianchetto comments after Diagram 9.
Count squares if you want a first cut at how things stand. A queen on a wide open board, except for a pawn in front of the king, controls 27 minus 1 or 26 squares, so if a queen, by itself, is attacking a castled king and rook, with intact pawns in front of the king, count 5 squares for the king, 5 squares for the pawns, and 7 squares for the rook. This quick count says that there are 9 more squares attacking than defending, which can cause trouble but probably won't be enough for mate.Add a pawn to the queen, and the net count goes up to 11, still not enough to mate, but ... if the defending rook is out of the picture, as it is in Lolli's mate, the net square goes up another 7 and now 18 is plenty. Again, verify the situation when you can by looking at actual moves.
The position in Diagram 4b shows mate with a bishop and rook. It's based on a famous casual game between Reti and Tartakover where Reti sacked his queen on d8. Black's king stands alone against rook and bishop, which is the stuff of legends but doesn't end up well for the king.

In Diagram 5a, White forces mate by QxN. Black has to recapture with the g pawn, and after White's rook checks on the g file and the king moves to h8 (Diagram 5b), the bishop takes the pawn on f6 with mate.
Diagram 6 is Morphy - Paulsen, New York 1857. Morphy checkmates his opponent in four moves.
Diagram 6

When your opponent's king is cut off on the edge of the board, he's in big trouble. But how do you force the mate? If White plays his rook to h8 at once, black interposes his rook and blocks the check. Morphy first forces Black's king to h7 with R(8)g6+ and then checks with his bishop Bg8+, forcing the king to the back rank, Kh8.
In the process, and without losing any time, Morphy has also taken control of the h7 square with his bishop, so after White's Rh6+ and Black's only response Rh7, White's rook captures with check and mate, supported by the bishop, RxR(h7)+.
The two bishops mate in Diagram 7 is Edward (not Emanuel) Lasker vs. Englund, Scheveningen, 1913.
Diagram 7

Lasker played Qxc6+, forcing Englund to take with the pawn, opening the a6-c8 diagonal for Ba6+ and mate. Let's look at the same mate from a little different starting position, shown in Diagram 8.
Diagram 8

Diagram 8 looks like Diagram 7, but Black has a knight on d7 and White's rook is no longer on the d file. In Diagram 7, the rook on d1 stopped Black's king from escaping via d7. In Diagram 8, Black's own knight serves the same purpose. The knight's presence is disastrous for Black - not only does it defend nothing, but it actively prevents the king's escape. This means that White no longer needs the rook. Note that a bishop or a queen on d7, instead of the knight, would prevent the mate. White's play is the same as before, Qxc6+, and after bxc6 then Ba6+ mate. This mate happens. Watch out for it, especially when you or your opponent castles queen side.
Diagram 9 shows the evil consequences of a weakened king side.
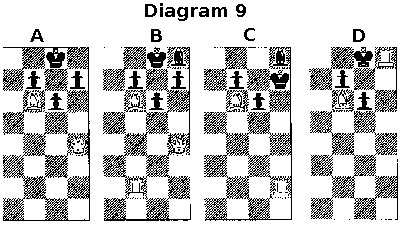
Diagram 9a looks familiar. It's Lolli's mate with a bishop instead of a pawn. White mates after Qh6 and Qg7+.
Add a defending bishop and the queen and the bishop are stopped, but if White can add one more piece, say a rook, and Black can't match him (Diagram 9b), then the king is back in play. White can force mate with the Queen sacrifice Qxh7+. Black has to recapture with the king Kxh7, and after White checks on the file with Rh2+ (Diagram 9c) Black's king is forced back to g8 with Kg8, and the rook mates with Rxh8+ (Diagram 9d).
Note that a black rook on f8 wouldn't help Black.
Black's bishop is on the black squares just like White's bishop, but if Black had a white squared bishop instead, it couldn't help defend against White's attack on the king, because the attack is taking place on black squares. In the endgame, bishops of opposite colors tend to be drawish, but in the middlegame, they can lead to deadly attacks. If you find yourself in a bishops of opposite color middlegame, look for a way to use your own bishop effectively. If you just let it sit there, you are playing a piece down.
The fianchetto (knight's pawn up one, bishop behind it) can be strong if the bishop is used properly, or weak it the other side manages to get rid of the bishop and takes over the empty squares it left behind. Besides protecting the king, the fianchettoed bishop can become a powerful attacking piece once it gets into play. White sometimes forces B-h6 to force a swap, although Black, usually after playing his rook out of the way, can retreat his bishop to h8 to avoid the swap. Occasionally, the bishop on the long diagonal turns out to be worth more than a rook, and one player will deliberately sacrifice the exchange.
Let's continue. Instead of having Black's bishop on h8, suppose we put him on f8, as in Diagram 10. This lets Black move the bishop to block a check. What can White do?

Well, if we add one more white rook, plenty (Diagram 10a). White starts with a queen sacrifice Qxh7+ which forces Black to capture with Kxh7. White swings one rook over to the open file with Rh2+ (Diagram 10b). This time Black doesn't have to bring his king back with Kg8, where he'd be mated on the move. Instead he interposes his bishop with Bh6 (Diagram 10c). Now White could double his rooks on the h file, and in the position shown, mate follows, but this would allow Black one free move and if he happened to have another piece nearby, say a knight which could get to f5 in one move, he might be able to block the mate. Remember, White has sacrificed his queen, so Black might be able to give some back and still come out ahead.
Forcing moves are safer in this type of position, and instead of using a move to double his rooks, White sacrifices one rook for the bishop with check RxB+ forcing Black to recapture KxR without giving him time to call for help. Now White mates on the move with Rh1+. Black's g pawn stops his own king from running horizontally, and White's bishop cuts off the diagonals.
Diagram 11 shows the analog of Diagram 4b with Bishop and Rook delivering mate, but this time with the Rook doing the dirty work. Note that in both positions the king is cut off from escaping diagonally by his own pawns.

In both Diagrams 11a and 11b, White mates with Rd8+.
Something completely different. Diagram 12 shows a typical rook and knight mate.

Diagram 12a. Black's king is cut off on the back rank, which is never good for the king.
White checks with the knight Nf6+ and the king is forced to the corner Kh8 (Diagram 12b).
White's rook mates with Rh7+(Diagram 12c). The knight does two things - it protects the rook and it also cuts off the king's escape at g8. The king is shown in the corner, but if he were closer to the center the mate would still work if there were a rook or a knight next to him, keeping him from escaping to the side.
Be careful to protect your king, but be just as careful how you protect him. Sometimes the king needs a little breathing room. One of Steinitz's rules is to protect the king, but only with the exact amount of material that's required. In other words, if you need a bishop and a knight, don't tie you queen down too.
Up until now, we've been looking at basic patterns. Here are a couple more examples from actual games.
Diagram 13

Black's queen and knight are out of play as far as Black's king is concerned. The king is on his own against White's queen and rooks.
Diagram 13 is a modified version of a position which occurred between Morphy and Lowenthal, London 1859. In the original game, the black rooks were on e8 and h8. Here, I've shown them on e8 and d8 to force Black to accept White's coming rook sacrifice. White has already sacrificed his knight for a pawn on b6 and Black has recaptured with his pawn on a7. Now b6 is not protected. White moves Rc7+ and Black has to capture. After Kxc7 White mates in two moves, starting with Qxb6+ and then, no matter where Black goes, with Qb7+ and mate. The point of Rc7+ is to entice (read force) Black to move to the square c7, where he'd rather not be.
Diagram 14 shows a position from Karpov vs Taimanov, Leningrad 1977. Black to move.
Diagram 14

White controls 40 squares, Black 50.
Square counting says Black should be looking for a combination.
Taimanov considers this to be one of the finest moves of his career. Black played Ng3+ and White resigned. White has two choices, take the knight with the queen or take it with the pawn. Taking with the queen leaves the rook unprotected and Black plays RxR which also pins the bishop. With the king stuck in the corner and the queen tied down trying to protect the bishop, White's position is in shambles. Black will soon win even more material.
What happens if White captures with the pawn? He gets mated, but not the way you think. After White plays h2xN Black moves his rook all the way back to a8 threatening to move to h8 with mate.
I included this diagram for several reasons. First, it's a great example of how quickly a piece can move from one place to another if it has open lines. Two moves and the rook is all the way across the board. Second, it shows how dangerous an open file can be in the castled position. Third, it shows how a piece sacrifice can open up the king to attack. But there's a lesson here for the attacker, too. Before you sacrifice, consider all the moves the defender can make.
Diagram 15 shows the final position which results from h2xN. White is checkmated as planned, but did you see this position when you first looked at the rook transfer? I didn't.
Diagram 15

Here's what I'm getting at. When you sacrifice material, and especially when you sacrifice a lot of material, remember that your opponent might be able to give some of it back to get out of trouble, leaving you still down material with a lost game. The more material you sacrifice, the more he can give back.
Sometimes you won't be able to calculate all the variations, but with experience you'll have a pretty good idea whether or not your sacrifice will work. If it looks good to you, calculate it as accurately as you can, and if you still feel good about it go ahead, but win or lose, analyze it in detail after the game. This is the way you learn.
Here are the moves that White could play to delay the inevitable checkmate which follows 39 hxN.
| 39 | .... | Ra8 |
| 40 | Qf2 | QxQ |
| 41 | Rb4 | Qxf1+ |
| 42 | Kh2 | Ra2 |
| 43 | Rb2 | RxR |
| 44 | Kh3 | Qh1+ |
| 45 | Kg5 | Qh5+ |
and it's finally mate.
That's a lot of moves. If your opponent got lucky, he might even win on time should your flag fall. I once lost a game after getting a vicious attack against my opponent's king and hounding him all the way across the board, where my own king waited. I saw too late that this wasn't going to work, but by then I couldn't do anything about it. I ran out of checks, and in fact I ran out of all useful moves, and my opponent mated me with his queen supported by his newly arrived king. It's the kind of thing that makes chess interesting.
We've covered the basic checkmate patterns, but you need to do lots of practice problems to become a good player. There are many checkmate books available, but the following are my favorites.
The Art of the Checkmate, by Georges Renaud and Victor Kahn (Dover) is one of the best. You should buy a copy and and keep it forever. It's well written with lots of examples grouped together by theme.
Another useful book is 1001 Brilliant Ways to Checkmate, by Fred Reinfeld (Melvin Powers - Wilshire Book Company), which you should also own. In fact, you should buy two copies, one to keep, and one to take apart page by page and carry around to study. Reinfeld also put together another useful book, a collection called 1001 Brilliant Chess Sacrifices and Combinations. Same advice.