Download
How to Play Chess Well
A Simple Method For Playing Good Positional Chess
Copyright 2011 by Ed Kotski
How can you get better at chess? Bobby Fischer said that one day he just got good. If that works for you, great, but most of us need a Plan B.
Some people don't bother to study. They just play for fun. Others have devoted their lives to the game, which works but imposes a high life cost. Is there some middle way, one which moves us up the skills ladder without too much effort? I think there is, and I call it Square Counting.
This article concentrates on the positional side of chess, and more specifically on how to reach (for yourself) or to avoid (for your opponent) positions with good tactical opportunities. The catch is that to take advantage of those good positions you need to be able to see the combinations. I've included a section at the end of this article called Things You Need to Know which will help you work on your tactics.
Let's start with an example. An example of what you shouldn't do.
Diagram 1
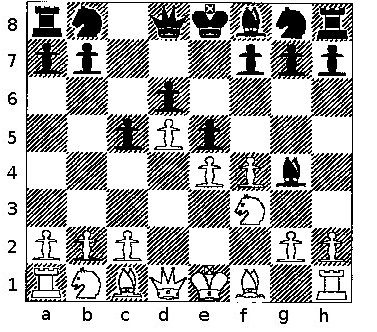
Morphy v. Meek, Casual Game , Position after 5 ... B-N5
Black seems to have a plan. He has lost to Morphy before, and must realize that he is going to lose again. Maybe he can get rid of enough material to keep from getting mated in the opening. We can see how well his plan worked by looking at his position after another 5 moves (see Diagram 5, near the end of the article, but not yet). If Meek had counted squares, he would have found a better move and a better plan. Come back to this diagram before you get to Diagram 5, and see if you agree.
Square Counting
There are two parts to square counting - first, how to count the squares and second, why bother?
I've been playing chess for a long time. Some time back I came up with a way to help me find good moves and avoid bad moves, especially in the middlegame. It's so simple that I can't be the first to have discovered it, but as far as I know, I'm the first to write about it. It's easy enough to use in a tournament game and yet it's sophisticated enough to produce good chess. Here it is.
Playing Chess is like playing Monopoly. Squares count.
The player who controls more squares has the better game. Wait a minute, you say, that's trivial. I already know all about squares. Ah yes I reply, of course you do. I used to know all about squares, too. But do you actually count them up?
The important thing is not just the number of squares you control, or the number of squares your opponent controls. It's the difference in counts, or your number minus your opponents number. You can make decisions based on this number. For example, if you control 43 squares and your opponent controls 33 squares, you control 10 more squares than your opponent, and that tells you to look hard for a favorable combination.
P, R, N, B, Q, K are shorthand for white pawn, rook, knight, bishop, queen, and king.
p, r, n, b, q, k are shorthand for black pawn, rook, knight, bishop, queen, and king.
Diagram 2a
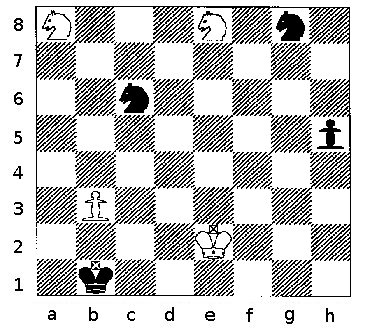
Diagram 2a shows how to count for Pawns, Knights, and Kings.
The white pawn on b3 can capture in two different directions (a4 and c4). It controls two squares, and is the only white pawn. P = 2.
The black pawn on h5 can only capture in one direction. It controls one square, and is the only black pawn. p = 1.
There are no rooks, bishops, or queens in Diagram 1. R, B, Q, r, b, q all = 0
The white knight on a8 has two captures. The white knight on e8 has four captures. N = 2+4 = 6.
The black knight on c6 has 8 captures. The black knight on g8 has 3 captures. n = 8+3 = 11.
The white king on e2 has 8 captures. K = 8. The black king on b1 has 5 captures. k = 5.
Count for Diagram 2a
| P | R | N | B | Q | K | p | r | n | b | q | k |
|---|---|---|---|---|---|---|---|---|---|---|---|
| 2 | 0 | 6 | 0 | 0 | 8 | 1 | 0 | 11 | 0 | 0 | 5 |
If this represented an actual game, white's total count would be 2+6+8 which is 16. Black's total count would be 1+11+5 which is 17.
Note that rook pawns on their original files have only one capture, but when a rook pawn captures, it turns into a knight pawn with two available captures, and in addition opens up new squares for a rook in the corner. This is not to say that doubled pawns are necessarily good, but that they might not be so bad, especially in conjunction with the new open file.
Diagram 2b
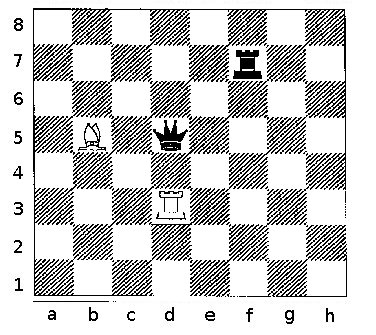
Diagram 2b shows how to count for Bishops, Rooks, and Queens.
The white rook on d3 controls four squares vertically and seven squares horizontally. R = 4+7 = 11.
The white bishop on b5 has seven captures. It would have nine if the rook weren't on d3.
The black rook on f7 controls fourteen different squares, seven on the rank and seven on the file. It is the only black rook. r = 14.
The black queen on d5 controls twelve squares diagonally, six squares horizontally, and five squares vertically. q = 12+6+5 = 23.
Count for Diagram 2b
| P | R | N | B | Q | K | p | r | n | b | q | k |
|---|---|---|---|---|---|---|---|---|---|---|---|
| 0 | 11 | 0 | 7 | 0 | 0 | 0 | 14 | 0 | 0 | 23 | 0 |
This diagram also shows pieces which block the line of other pieces, and this is important. The rook on f7 blocks the queen from attacking g8, taking away one potential square from the queen. Likewise, the bishop on b5 cuts the queen off from a5, taking away one more square. The rook on d3 takes away the two squares d2 and d1. If these three blocking pieces were not there, the queen would control an additional 4 squares. Again, we notice that the queen is blocking the rook's access to three additional squares, d6, 7, and 8. Here is the point. Don't block your own pieces if you can help it. Consider moving blockers away if they are yours, or driving them away if they are your opponent's. In either case, open up lines and control squares.
If lines are blocked with pawns, or with opponent's pieces supported by pawns, it might not be easy to get the blockers out of the way. Remember that your strategy should be to maximize the number of squares you control while minimizing the number of squares your opponent controls, and make your moves accordingly.
Note that an occupied square still counts, and that, as far as the count goes, it doesn't matter what kind of piece is doing the occupying or whose piece it is. The queen on d5 controls the square d3, even though a rook is sitting there, but the queen does not control d2 or d1 because those squares are blocked by the rook. The square d5 does not itself count as a square controlled by the queen.
Cave Canem
1) Remember that square counting is only a one ply tool. You look at the position in front of you and find a move that increases the number of squares controlled by you and decreases the number of squares controlled by your opponent. If you see a move which temporarily blocks your own pieces but actually leads to a greater square count within a couple of moves, you should consider it. For example, you might want to get a knight to a very good outpost, but might need to block a couple of your other pieces along the way. Don't rule out this kind of move as long as the blocking piece is yours, and as long as you can move it out of the way quickly. The goal is to control more squares than your opponent. And the more the more, the merrier. Looking more than one ply is good but time consuming.
2) Square counting can be a leading or a lagging indicator of your position. If your square count is better than your opponent's, then you probably have a better position. If you do, the square count is a leading indicator. Sometimes, though, your square count might suggest that you have a better position when in fact you're about to lose your queen. Once your queen is gone, your square count will show a large drop, but the drop might not show up in time to warn you. In this situation, your square count is a lagging indicator.
2) Square counting only suggests possible moves. It's up to you to see if those moves lose. If a move loses, the game is over, so you have to be careful to combine square counting with tactics. Don't confuse square counting with the complex evaluation of a computer. If you can do what a computer does, you don't need to count squares, but while you're alone at the board, square counting is useful.
Diagram 3
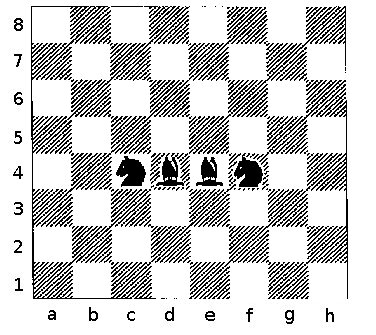
Which are better on an open board, knights or bishops?
The two bishops on d4 and e4 are on unobstructed diagonals. Each bishop controls a maximum of 13 squares, so the two of them together control 26 squares. The two knights on c4 and f4 each control 8 squares, the maximum for a knight. The two knights combined control 16 squares.
Another feature of the bishops is that bishops of opposite colors tend to be drawish in the endgame, but can support ferocious attacks in the middlegame. Why? Because the squares attacked by one bishop can't be protected by the opponent's bishop. Unless both sides are keeping their bishops busy, it's as if one side has an extra piece, or in terms of territory, an extra several squares.
There are more examples, but here's the conclusion I've drawn. Counting squares is consistent with many of the accepted principles of good chess, but it's easier to use because it's only one rule instead of five or six.
Checkmates
Experienced players know that it takes a certain amount of extra material to force checkmate. A king and a pawn against a king generally isn't enough, but once the pawn promotes to a queen, it's a different story. Maybe we can talk in terms of squares instead of pieces. Is there some minimum number of square count difference required to force a mate? As it turns out, the answer is yes.
What we see next, in Diagram 4, is that it takes a difference of about fifteen squares to deliver mate, although it can be done with fewer in special positions. This is also a good time to point out that a king out on the board controls 8 squares, that a king on the back rank controls at most 5, and if he is in the corner, his control drops to 3. In the same way, the knight's square count goes down as the knight strays from the center.
Diagram 4
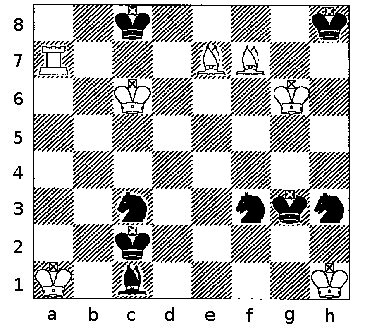
Diagram 4a - k on c8, R on a7, K on c6
Diagram 4b - k on h8, B on e7, K on g6, B on f7
Diagram 4c - K on h1, n on h3, n on f3, k on g3
Diagram 4d - K on a1, k on c2, b on c1, n on c3
Diagram 4 shows four separate mating positions.
Diagram 4a is a typical King and Rook against King ending where White will mate with Ra8. Let's count squares. The black king is on the back rank and controls five squares. The White king is on the sixth rank and controls eight squares. The white rook controls all seven squares on both its rank and its file (we're ignoring the pieces from Diagram 4b). So, white has 8+14 = 22 squares while black only controls 5. The difference in square count is 17.
Diagram 4b is a typical King and Two Bishops against King ending where White will mate with Bf6. Again, let's count squares. The black king is in the corner and controls three squares. The White king controls eight squares. The bishop on f7 controls eight squares and the bishop on e7 controls nine squares. White has 8+8+9 = 25 squares while black only controls 3. The difference in square count is 22.
Diagram 4c is a not at all typical, but ..... We have a king and two knights against a king where Black will mate with Nf2. Again, let's count squares. The white king is in the corner and controls three squares. The black king controls eight squares. The knight on f3 controls eight squares and the and the knight on h3 controls four squares. Black has 8+8+4 = 20 squares while white only controls 3. The difference in square count is 17. If white had played badly, he could have ended up in this position, and the two knights could mate. What makes this position relevant is that if white had an extra ( ! ) pawn on just the right square, a two knight mate could be forced with a square count of 15.
Diagram 4d isn't typical either, but for a different reason. It's a King, Knight, and Bishop against King ending where Black will mate with bb2. This ending almost always occurs as a threat (because two bishops can force mate), rather than as moves on the board. Counting squares, the white king is in the corner and controls three squares. The black king controls eight squares. The knight on c3 controls eight squares and the and the bishop on c1 controls seven squares. Black has 8+8+7 = 23 squares while white only has 3. The difference in square count is 20.
Is square counting worth your time? Here's a little quiz, to help you decide.
- What should you do when you control 1 square more than your opponent?
- How about 5 squares?
- 10 squares?
- 15 squares?
1) One square doesn't mean anything, especially in the opening. But, if 1 turns into 2, and then into 3, watch out. If the trend is in your favor, you are outplaying your opponent, but if you are down, then you are drifting into trouble. The opportunity for combinations usually isn't there when the square count is equal, so don't waste too much time looking for ways to win material. The old admonition "Play the Board" takes on new significance. When you are a few squares up, play to increase your control of the board. If you are down squares, then spend most of your thinking time trying to get your count back up and not on looking for combinations.
2) Five squares represents a positional advantage. You're getting into combination territory. If you are up five squares or more, you have a good chance for tactics. By the same token, if you are down five squares, you need to be extra vigilant against your opponent's threats while you concentrate on improving your square count.
3) Ten squares and, as Lasker used to say, ceteris paribus, you are doing well. A ten square advantage in the middlegame is a wonderful thing, and you should keep your eye out for a good combination.
4) A fifteen square advantage is rare, but if you get one, look for an immediate forced win.
That sounds easy. So, what's the catch? Well, I've found two. First, chess is a tactical game. If your opponent can find combinations much better than you, you're going to lose. Always, although counting squares will let you survive longer. So, against a better tactician, counting squares will help, but it won't be enough. The second problem is that counting squares takes time. It's more practical in slow games than it is in blitz. But even in a fast game, without counting, you'll be able to spot some very reasonable candidate moves just by noting whether they increase or decrease your count. It saves time to ignore pieces which give both you and your opponent the same count. For example, if you both have the same number and disposition of pawns on the board, then you can ignore the pawns in your count. In the same way, kings on the back rank and knights in the center can also cancel out your opponent's similarly placed kings and knights, leaving only bishops, rooks, and queens to be counted. During practice you should count them all, because it will call your attention to poorly placed pieces.
Chess Transform
I'm an engineer by training, and am comfortable solving things using transforms. For example, a difficult to solve differential equation in some variable or other is transformed into a relatively simple algebraic equation in a new variable. The new equation is then solved and the solution is transformed backwards to give an answer in terms of the original variable.
Playing chess by counting squares is a form of transforming the thought process from "if I play the knight here, what will my opponent do?" into the much easier "if I play the knight here, by how much will I increase or decrease the relative square count?" You still need to look for tactics, but you have greatly simplified the problrem of deciding what to do "when there's nothing to do".
How to Play
When you play a real game, you should place your pieces on squares where they do three things: a) they have the greatest possible number of captures (squares, not necessarily pieces), b) they hinder the scope of your opponent's pieces, and c) they do not block the lines of your own pieces.
Remember that your moves must be tactically sound. Tactics always takes precedence. For example, placing your queen on a square where it has enormous control over the board but where it can be pinned and captured by a bishop is usualy a bad idea, although once in a while local space superiority might justify a sacrifice.
I'm giving what follows its own paragraph, because my conscience wouldn't let me put it in the same paragraph that begins with a warning about sound tactics. Nevertheless, as an example of a sacrifice of material for space, take the example of a piece sacrifice against the king's position. Even if you can't calculate all the variations accurately, you still might want to consider it if your superiority in square count in the area near the king will be at least as much as say 15 or so squares, and will remain that high for the next few moves.
And finally, never give squares up for free. Instead get more. If you have an open file for your rook, don't plug it up. Use it.
Back to the Beginning
This would be a good time to go back to Diagram 1 and see if Meek is on the right track in his game with Morphy. Think only in terms of square counting and decide if Meek should swap his bishop for Morphy's knight. Then, see if the conclusion which you reach is consistent with the all the standard rules for good positional chess.
When you Count
Start with your own pieces, be systematic, and always count in the same order: pawn, rook, knight, bishop, queen, king. When you count the queen, do her rook moves first and then her bishop moves. Do the same with your opponent's pieces. It's helpful to keep track of the number of squares controlled by each piece. You can't write your counts down during a tournament game, but, as I suggested earlier, write them them down during practice.
Remember that square counting is an alternate way of evaluating a chess position, and by extension, an alternate way of generating possible moves. Instead of working your way through a whole string of "If I go here, he'll go there's", most of which will turn out to be irrelevant, you can just count squares and come up with some pretty good moves, and what's even better, with some good plans.
Sample Games
Let's see how Judge Meek has been doing against Morphy.
Diagram 5 is from the game Morphy vs Meek, New York 1857, which you can find in Appendix 2. It's in descriptive notation which is explained in Appendix 1, How to Read Chess Notation, and is taken from Tartakower and DuMont, 500 Master Games of Chess, Dover. It's also in Sergeant's collection of Morphy's games where it's listed as a casual game. Only the first 12 moves are known. T and D analyze possibilities after Morphy's twelfth move.
Diagram 5
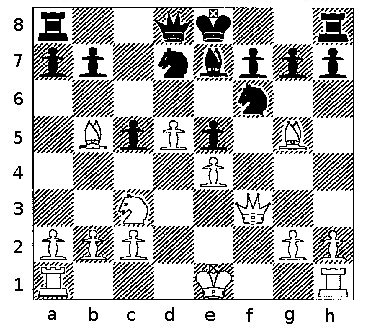
Morphy v. Meek, Casual Game , Position after 10 ... B-K2
When we looked at the game five moves ago, Meek had brought out his bishop and was pinning Morphy's knight. We only mentioned squares and didn't count, but in fact Morphy was leading by 3. How do things look now, after the tenth move?
They look grim for black. No one seems to know for sure how the game turned out, because the scoresheet only shows twelve moves. Tartakower and DuMont analyzed the resulting position, and decided that Morphy wins easily, so my guess is that Meek resigned and they went to dinner.
This game shows that an advantage in squares can corelate with a superior position. White wins quickly, so where did Meek go wrong? White was 3 squares up after move 5. Square counting suggests that 6 .... BxN was very bad. After the recapture on move 7, White jumped to a 12 square advantage and the game was over in another few moves.
In retrospect, it's easy to say that Black didn't play very well, but many times we don't either. We can say that Meek violated several fundamental principles - he wasted time, he exchanged a newly developed piece for one already developed, he brought Morphy's queen into the game, and so forth. One problem with this kind of criticism is that these were Steinitz's principles, and at the time, Steinitz hadn't discovered them.
If Meek had counted squares, he would have realized that taking the knight was not a good move.
Granted that Meek was nowhere near Morphy's strength, let's see what happens when two less unequal players slug it out. Young Emanuel Lasker was as gifted as Morphy, but Blackburne was a much better opponent than Meek.
Diagram 6
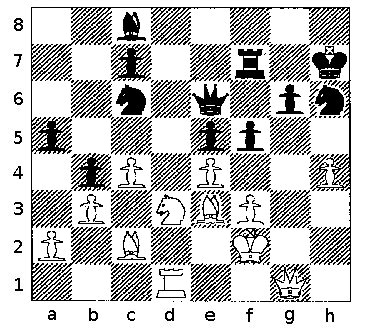
Blackburne v. Emanuel Lasker, first match game, 1892, Position after 33 Nc1-d3 f5
Diagram 6 is useful for two reasons. It again shows how square counting can corelate with position, but it also serves as a warning to watch out for tactics.
The full game is in Appendix 2. Up to this point Blackburne has been doing fine, but he is about to throw away a piece. We need to ask two questions: First, what do the squares say? Second, what do the tactics say?
Blackburne controls 59 squares, while Lasker controls 53, so Blackburne should have a little better position, and I'm sure that if the board were turned around, Lasker would win. On the other hand, Blackburne's King is exposed, which might have made him nervous, and Lasker's queen is just sitting there, waiting to be attacked.
Blackburne should have played Qg5 immediately, taking advantage of Lasker's knight on h6, and keeping open the possibility of playing his bishop to c5 (in case Lasker pushed his pawn to f4). Instead he moved the Knight to c5, where it pushes the queen back, but at the same time becomes a target for the queen, and a liability. Blackburne should have seen that Lasker would capture the bishop with check, winning the bishop, but his error is especially instructive because it's typical of the errors we make in our own games.
I doubt that Blackburne counted squares (although I'm not so sure about Lasker), but the position gives us a good example of why it is so important to verify the tactical soundness of every move. Square counting would not notice the check. Checks are tactical. Blackburne would have noticed the drop in count after his bishop came off, but that's a little late.
And that's it for square counting. I hope it works for you. Now, to finish things off, here are a few ......
Things You Need to Know
1) Notation. Appendix 1, How to Read Chess Notation, shows you how to read and write chess moves.
2) Tactics. Chess is a tactical game. If your opponent can find combinations better than you can, you're going to lose. Counting squares will let you survive longer, but won't be enough against a better tactician. To use square counting effectively, you also need good tactics, which takes practice. Fortunately, a few types of combinations occur over and over, and once you learn to recognize their patterns you will improve quickly. As you get better, you'll find that combinations don't always have to win material - instead, they can lead to a positional advantage. You'll find examples in Appendix 6.
Appendix 6a - Checkmates
Appendix 6b - Basic Combinations
Appendix 6c
3) Endgame. You should learn some endings because most games between good players are won or lost in the endgame. Spend most of your time on tactics, but put some work into the endings too. Endgames require both pattern recognition and accurate calculation and most great players have also been very strong endgame players. You'll find examples in Appendix 3.
4) Opening. Start with simple openings that get you safely into the middlegame, and later on learn two or three systems well. Openings have personalities, and you will be much more comfortable with one than with another. As your game improves, put more time into your favorites, but at first, put most of your effort into tactics. I'll give you a few tips in Appendix 4.
5) Middlegame. Work on your middlegame. Books upon books have been written about the middlegame, and while you're trying to master dozens of topics, practice square counting. It covers many traditional topics with one umbrella. Appendix 5 has some suggestions.
6) Games. Play over master games. Once you have learned the basics, this is probably the surest path to becoming a good player. Appendix 2 has a few of my favorites.
Appendix 2a
Appendix 2b
7) Observations and Suggestions. Appendix 7 has a few of mine.
