Appendix 6b: Basic Combinations
How do you win a game of chess? Well, if your opponent is too strong for you to checkmate early, you'll have to win the hard way by taking lots of his material without giving up too much of your own. You do this with combinations, a chess term for a move sequence which forces your opponent to give something up, usually catching him by surprise. Mine sometimes surprise me more than my opponent.
Just as there are typical ways to checkmate, so there are typical ways to win material, little tricks that experienced players use all the time. They're the building blocks of a chess game and we'll go through the most common ones, the ones that you'll end up using over and over again. They occur so often that they have names.
The Fork, The Pin, Discovered Check, Double Check, Removing the Guard, Enticement, X-ray Attack.
Most of the prototypes are simple positions without clutter. There are sample problems in Appendix 6e and practical Snippets from Lasker's Games in Appendix 6d. You'll find some advice in Appendix 6c on making it hard for your opponent to conjure up a combination against you. Now let's get started.
The Fork
Diagram 1a shows a fork in it's clearest form - one pawn attacks two rooks at the same time. One rook can move, the other rook gets captured.
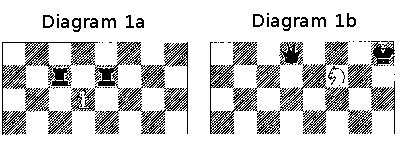
Diagram 1b shows one of the most dreaded fork in chess, a knight forks the king and queen. The king has to get out of check and the knight takes the queen.
The Fork is a good example of a double attack - you present your opponent with two problems which he has to solve at the same time. He might be able to do this if he could just make two moves in a row, but he can't, so something bad happens. If this sounds a little heartless, remember that the fork gets it's name from the tines of a pitch fork - two or three pieces can be caught on the tines with one good stab. What does winning material have to do with checkmate? Plenty. Most chess players use a strategy to win which is simple and effective. They try to win a piece or a couple of pawns and then swap off everything else, one for one. Once your opponent's pieces are all gone, it's easy to force a pawn through to queen, and then to checkmate his king with your king and your new queen. As a general rule, one pawn up often wins, two pawns or a piece up almost always wins.
The Pin
The Pin gets it's name from the way bugs are mounted on a display board, stuck through with little common pins. A pinned piece, like a pinned moth, isn't going anywhere. Pin's are dangerous. Don't let your pieces get pinned down, and if you can't avoid that, at least be ready to break the pin at a moment's notice.
Diagram 2a shows a bishop pinning a knight against the king on h8. This is an absolute pin because the knight can't move - it would put the king in check. If instead of a king, Black had a queen on h8 it would be a relative pin - the knight could move, although the queen could be captured. Both types are just called pins.
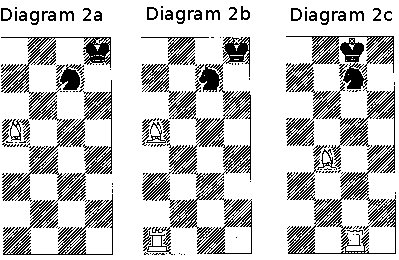
In Diagram 2a the bishop pins the knight. This doesn't look too bad - one piece attacks the knight, one piece defends, White takes the knight and Black takes the bishop for an even exchange. But, if we add a white rook, say on e1 (Diagram 2b), Black will lose the knight by force.
Let's say that it's White's move in Diagram 2b. He simply moves his rook to g1 attacking the knight a second time. It's only defended once and it can't move out of danger, so it has to stay and get captured.
How about letting Black move first in Diagram 2b? Black can see Rg1 coming, but can he do anything about it? If he can't move the knight, maybe he can break the pin by moving his king, leaving the knight free to run. Black's king has two squares available h7 and g8. Unfortunately Kg8 doesn't work, even though it breaks the pin by the bishop. White would move Rg1 pinning the knight with the rook, and capturing the knight on the next move.
If Kg8 doesn't work, how about Kh7? Too bad. Instead of Rg1 White plays Rh1+. Now where does the king go? He only has two squares, g6 and g8. If he goes to g8, White plays Rg1 and we know what happens next. If Black moves Kg6, the pin is gone, but he still loses the knight. White plays Rg1+, the king has to move off the file (X-Ray attack - see Diagram 10), and White takes the knight on the next move, maybe with the rook, maybe with the bishop.
Finally, Diagram 2c shows Black's knight pinned by the rook. White piles on with Be5 and the knight's goose is cooked. Here are a couple more examples.
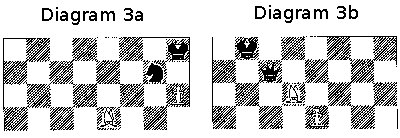
In Diagram 3a, White has pushed his pawn to h6. Normally the knight would just move away, but here it can't. Note that if Black had a protecting bishop on f8, White would take the knight with his pawn, not with his bishop.
Diagram 3b shows a bishop pinning and winning the queen. Note that even if the pinned pieces in these diagrams could somehow be protected by pawns, Black would still lose material, because the pinned piece is worth more than the capturing piece.
Diagram 4a shows a more complicated application of the pin, one that could happen during a game.
Diagram 4a
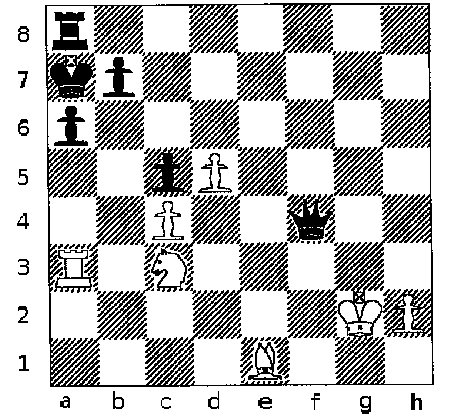
When things are over, the knight, the bishop, both rooks, and the queen will be off the board, leaving White with a won position. Do you see how? Here are the moves.
1 Ng5+
Our first application of the pin - a pinned piece can't do what it's supposed to do. The pawn can't take the knight, so the king has to move.
1 ... Kb8
If the king comes out to b6, he gets checkmated by the bishop Ba5+ so he has to go on the same diagonal as the queen.
2 Bg3 QxB+
Black loses the queen to the bishop no matter what he does. Taking with check gives him extra time.
3 Kg3 (KxQ)
White has a won game. He can also win with hg3 (PxQ), but we want the pawn on h2 to illustrate a point that we'll cover again in the Appendix on Endgames.
3 ... ab5 (PxN)
This is one of the quicker ways to lose. With the rook gone, Black has no chance of counterplay.
4 RxR+ KxR
5 cb5 (PxP)
The game is over, but you need to know how to win it. See Diagram 4b.
Diagram 4b
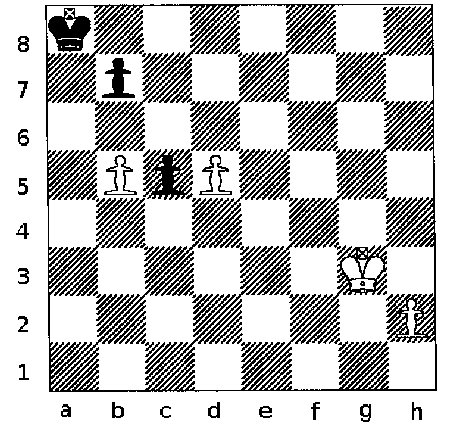
From the position in Diagram 4b, White has a forced win. We'll go into this in more detail in the Endgame Appendix, but here's what happens.
White's pawn on h2 is far enough away from Black's king to be a real threat. If it reaches h8 it becomes a queen and White wins. Against this, Black's b pawn can protect his c pawn meaning that White's king needs to stay near the c pawn to keep it from queening. As long as the c pawn is protected by the b pawn both are safe because as soon as White's king moves behind the c pawn to get to the b pawn, the c pawn advances and the king can't catch it. This leaves the Black king free to move around the board, so for White to win, his h pawn needs to be able to queen without much help from the White king. The closer White's unprotected passed pawn is to Black's king, the greater the danger that White might lose.
Before White could start his combination with Nb5+, he had to see far enough ahead to make sure the material would come out ok, but he also had to recognize that he would be in a won endgame and not a lost one. Making sound combinations takes practice, and you might have to suffer a little, but Chess is worth it.
Years ago, I watched a carpenter installing trim. He had a simple system, one nail, one swing of the hammer. Bang, bang, bang, nail, nail, nail, each nail perfectly set, one after the other, nonstop. He'd reach into his apron and take out a handful of nails and put them between his teeth and arrange them in a row, all nails pointing out. Then he'd take them out, lined up all points down, and hold them over the trim, feeding them one at a time to his hammer. All the while he never missed a swing. More amazingly, he never once hit his finger. Chess? I've had my share of sore chess fingers, and you'll have yours, but chess is worth a miss. It's part of the learning process. Now, where were we?
Discovered Check and Double Check
Discovered Check occurs when one piece moves, opening a line between the opposing king and a second piece which checks the king along that newly opened line. Double Check occurs when the second piece and the piece that moves both check the king at the same time.
Diagram 5 shows two examples of discovered check and one possible counter.
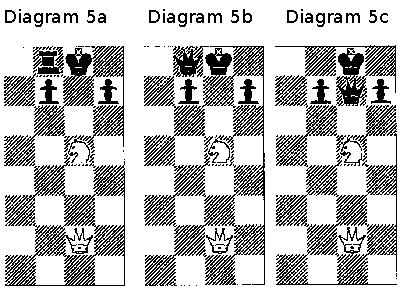
In Diagram 5a the knight moves from g5 to e6, putting the king in check with the queen. The king has to move - there is no other way to get out of check, and the only square available is h8. The queen then checkmates the king with Qg7+, protected by the knight on e6. Say that the king were on h8 instead of g8 right from the beginning. Now, if the knight tried going to e6, it wouldn't be with check, so Black would simply take the knight. This is the power of a discovered check - it lets the discovering piece, here the knight, move anywhere it wants without having to worry about being captured, because the king must always get out of check.
In Diagram 5b we replaced the rook with a queen. Now White can't mate on g7, but he can, and surely will, capture Black's queen after Ne6+. The lesson is this: Discovered Checks win games, for you or for your opponent, so keep your eyes open. Be very careful before letting your opponent double check you.
In Diagram 5c Black has just prevented a discovered check by putting his queen on g7, and the worm threatens to turn with h6, pinning and winning the knight. When you have to defend, defend, but try and get in a threat of your own.
Diagrams 6a and 6b show Black trying to prevent the discovered check with the threat of capturing the checking piece. Diagram 6c gives an example of a Double Check.
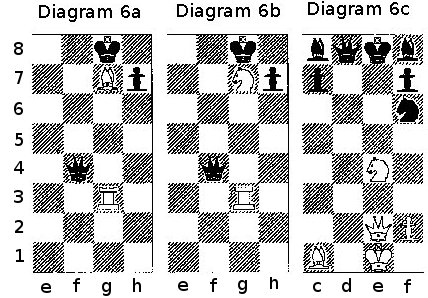
In Diagram 6a, Black plans on capturing the rook, but overlooks Be5+, which indirectly protects the rook with the bishop. After Be5+ Black might as well play QxR, when white plays BxQ.
Diagram 6b shows the same pattern, but this time with a knight. Nh5+ wins the queen.
Diagram 6c shows a double check. Note that Black can never capture either checking piece in a double check because there are two checking pieces. In a double check, the king has to move, and if he can't it's checkmate. NxN(f6)+ is double check and mate. Note that Black's knight on f6 might just as well be on g8 because it couldn't capture White's knight or block his queen check anyway. Also note that White's knight on f6 attacks d7 besides checking the king on e8. It's checkmate. Unless you really have things worked out, never allow your opponent to double check you.
Enticement
Enticement is another way of saying your piece is there, but I want it here, and it sets the opponent up for what's to come, maybe a fork, maybe a pin, maybe a checkmate. It's the first part of a two part process.
Diagram 7 shows an enticement.
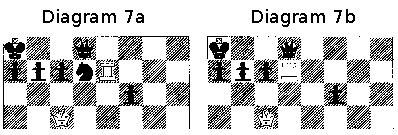
Diagram 7a shows Black's king hiding in the corner, protected by his queen and knight. What could go wrong? Well, suppose the knight were no longer there and also suppose the queen were not on the back rank where she protects the squares e8 and f8. Black could be in Trouble, with a capital T which rhymes with C, which stands for Checkmate. White plays RxN (Diagram 7b) and Black has a big problem.
If Black captures the rook, White plays Qf8+ and after Black blocks with his queen, QxQ is mate. This is the enticement - Black's queen needs to stay on the back rank to prevent the mate, but suddenly the knight has disappeared, and the queen herself is under attack. A stickler might point out that the queen isn't required to take the rook, she can just move out of the way, and I admit he'd have a point. Still, enticement implies an invitation, rather than a compulsion, and in this case, it doesn't help much to decline the rook.

In Diagram 7c Blacks queen went directly to b8. In 7d she went to the right (not shown) before going to b8.
No matter where Black moves, he loses. If he leaves his queen on d8, White captures with check, which means that Black can't counter attack White's queen - he won't have time to take it. Black's queen has few choices - if she goes left to b8 White will play Rxc7 (Diagram 7c) with Rc8 next, winning the queen. If she goes right, say to h8, White will play Qxc7 which forces Black's queen to come back over to b8 (Diagram 7d) to stop White's queen from mating on b7. But then White plays Rd8 which not only pins Black's queen but for good measure forces mate on the next move. Note that if Black tried Qc8 on his first move instead of taking the rook, then White's plays Rxc7 and the queen has to move and is still lost.
Removing the Guard
You're attacking an opponents piece but it's protected. Get rid of the protector and the piece is yours.
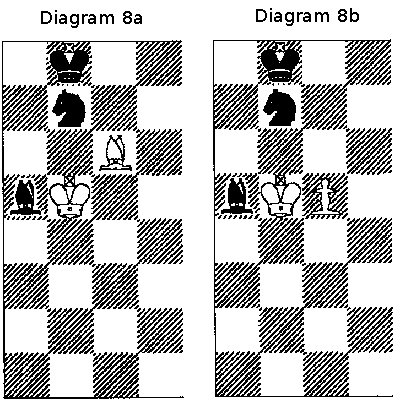
In Diagram 8a, Black's knight guards his bishop, but after White plays BxN, the guard is gone. If Black recaptures with KxB, then White takes the Black bishop with KxB, netting a piece.
Diagram 8b shows a more subtle example. Again, the knight guards the bishop, but after White pushes the pawn to c6 attacking the knight, Black will have two choices, both of them bad. If he moves the knight he loses the bishop. If he moves the bishop he loses the knight. Here's a little exercise for you - what could you add to the position in Diagram 8b that would thwart White's plan?
I'll tell you in a minute, but in the meantime here's some general advice about avoiding this kind of unpleasantness. Try to make sure that all your pieces are always protected by something because an unprotected piece draws trouble like a tall building draws lightning. Pawns usually make the best protectors but do the best you can. Now, here's the answer for Diagram 8b - a black knight on c2 would do the trick. Then if White played c6, Black could respond with Nd4+, forking the king and the pawn, chasing the king away from the pawn, and capturing it. Now lets look at some more removing the guard situations.
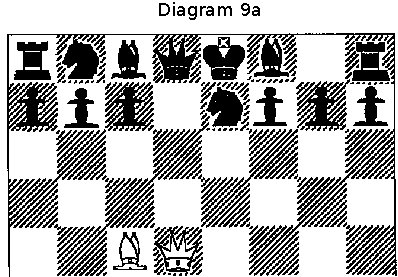
In Diagram 9a White plays Bxf7+, forcing Black's king to capture the bishop and to abandon the queen. Here, White captures the queen and keeps it, but once in a while Black deliberately lets the queen go and then gets it back with a good game. We'll see how in the Openings Appendix.
Diagram 9b is straightforward. Diagrams 9c and 9d are especially interesting.
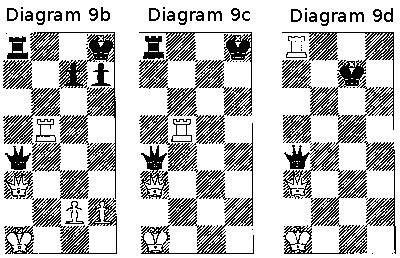
In Diagram 9b, Black has pinned White's Queen and is threatening to exchange it (for whatever reason). White does not play QxQ but instead plays Rf8+. Black must play RxR and White takes Black's now unprotected queen.
In Diagram 9c the pawns are gone, so Black can move his king up, getting out of check.
As shown in Diagram 9d this doesn't help Black, because White after he plays Rf8+ and Black moves his king, White then comes in behind Black's queen with RxR and Black has lost a rook. If Black's queen tries to recapture the rook, White's queen will take Black's queen. If instead Black's queen tries to take White's queen, White's rook, now on f8, recaptures leaving White a rook up. We saw this protection from behind earlier, in Diagram 6a, where a bishop protected the rook from behind the attacking queen.
X-Ray Attack
An X-Ray attack is like a one tined fork. Two pieces stand on the same line and the first is attacked. If it moves out of the way, the second piece falls.
Diagram 10 shows three examples of an x-ray attack, the first two along a file and the third along a diagonal.
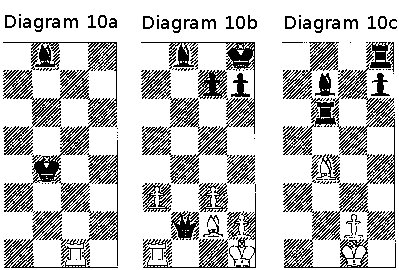
Diagram 10a shows the King and the Bishop on the same file. White plays Rf1+, the king moves off the file and the Rook captures the bishop on f8.
Diagram 10b shows the queen and bishop on the same file. White plays Rf1 attacking the queen. This time it's not check so the queen doesn't have to move off the file, and in fact doesn't want to move off the file, because that would leave the bishop unprotected and after RxB(f8)+ it would be checkmate. The queen has nothing better than QxR, and White has won a Queen for a rook.
Diagram 10c shows an x ray attack along a diagonal. White plays Be5 and picks up a rook.
This is a good place to give White a hand and to take a break. We've covered the main types of combinations, and that's a lot to digest in one sitting. There's more to do, though, so we'll pick back up in Appendix 6c Defending Against Combinations, Appendix 6d Snippets from Lasker's Games, and in Appendix 6e A Combination Quiz. By the time you're finished you should be a pretty good player, but this stuff takes practice and occasionally, like those of Burns's mouse, your best-laid schemes will gang a-gley, although hopefully not too aft. Patience and Fortitude. Which brings us to books.
One useful book is 1001 Brilliant Chess Sacrifices and Combinations by Fred Reinfeld (Melvin Powers - Wilshire Book Company), which you should own. In fact, you should buy two copies, one to keep, and one to take apart page by page and carry around to practice. Reinfeld also put together a similar book, a collection called 1001 Brilliant Ways to Checkmate. Same advice.
Another good one is Znosko-Borovky's The Art of Chess Combination (Dover). My copy cost $1.45 but that was a long time ago. Z-B's book is theory, Reinfeld's is drill. You need both. There are many other good books available, I just have a special attachment for these two.
How to Play Chess Well: Main Article
Return to Chess Main Page
